

Table of Contents
- The Real Cost of Custom Team Jersey Printing Cost
- DIY Screen Printing vs Heat Press: Which Method Works for You?
- Durability of Home vs Professional Shirt Prints
- When DIY Team Shirt Printing Makes Sense
- When Professional Team Shirt Printing Wins
- Environmental Impact: DIY vs Professional Printing
- Legal and Copyright Considerations for Team Shirts
- Conclusion
- Frequently Asked Questions
Last Updated: September 27, 2026
The Real Cost of Custom Team Jersey Printing Cost
Team shirt printing costs swing wildly depending on whether you press the shirts yourself or hand the job to a shop, the biggest factor in the DIY vs professional team shirt printing decision. This guide from Merch by Mary Ellen breaks down the real numbers, the durability trade-offs, and when outsourcing actually saves money.
DIY Startup Costs: Equipment and Materials
A basic home setup includes a heat press or screen printing kit, blank garments, transfer materials, and design software. Expect to spend on the press, then keep spending on blanks and vinyl as orders grow. Screen printing adds emulsion, screens, and ink; heat transfer vinyl (HTV) trades those for a cutting machine and film rolls.
- Capital equipment (one-time): heat press, cutting machine, or screen printing kit, plus a decent ironing surface and heat-resistant tape.
- Consumables (per shirt): blank tee, vinyl or transfer sheet, ink or emulsion, and packaging.
- Waste allowance: most beginners scrap 10-20% of blanks in their first few sessions before settings are dialed in.
- Time: pressing, weeding, and curing eat evenings. That time has an opportunity cost even when it doesn't show up on a receipt.
Professional Pricing: Per-Item vs. Bulk Orders
Professional shops price per item, and that price drops as quantity rises. Bulk orders spread setup costs across more shirts, so a 40-shirt team order costs far less per piece than a single custom tee.
| Order Size | Pricing Model | What Drives the Price |
|---|---|---|
| 1-5 shirts | Per-item, highest rate | Setup and labor spread thin |
| 6-20 shirts | Per-item, moderate rate | Small-batch production |
| 21-50 shirts | Bulk rate begins | Setup cost amortized |
| 50+ shirts | Best per-item rate | Screen or DTG efficiency |
The Break-Even Point: When Professional Printing Gets Cheaper
Work through it in three steps:
- Add up your per-shirt consumables. Blank tee + vinyl or transfer + ink + packaging. Call that your DIY unit cost.
- Add your waste rate. If you scrap one in eight shirts, multiply your DIY unit cost by roughly 1.13 to get your true cost per sellable shirt.
- Compare against the shop's bulk per-item price at your actual order quantity, not at quantity one.
Run the numbers for your own roster before you buy a single roll of vinyl. The break-even point is the whole decision in one figure.
DIY Screen Printing vs Heat Press: Which Method Works for You?
DIY screen printing vs heat press comes down to volume and design complexity: screen printing wins on long runs of one design, heat press on small batches and multi-color designs.
Screen Printing at Home: Setup and Learning Curve
Home screen printing demands space, ventilation, and a curing process. You'll burn screens, register colors, and cure each print properly or the ink washes out. This is where most beginners quit.
Heat Press and Heat Transfer Vinyl: Faster but Different
A heat press is the friendlier entry point: cut vinyl, weed it, and press at a set temperature and time. The catch is durability, poorly pressed HTV peels, and layered vinyl can feel stiff.
Durability of Home vs Professional Shirt Prints
The durability of home vs professional shirt prints shows up fastest in the wash. Professional DTG and screen prints bond ink into the fabric fibers, while home iron-on transfers sit on top and fail first. That difference is mechanical: ink that penetrates the weave is held by the fibers, while a transfer film is held only by adhesive.
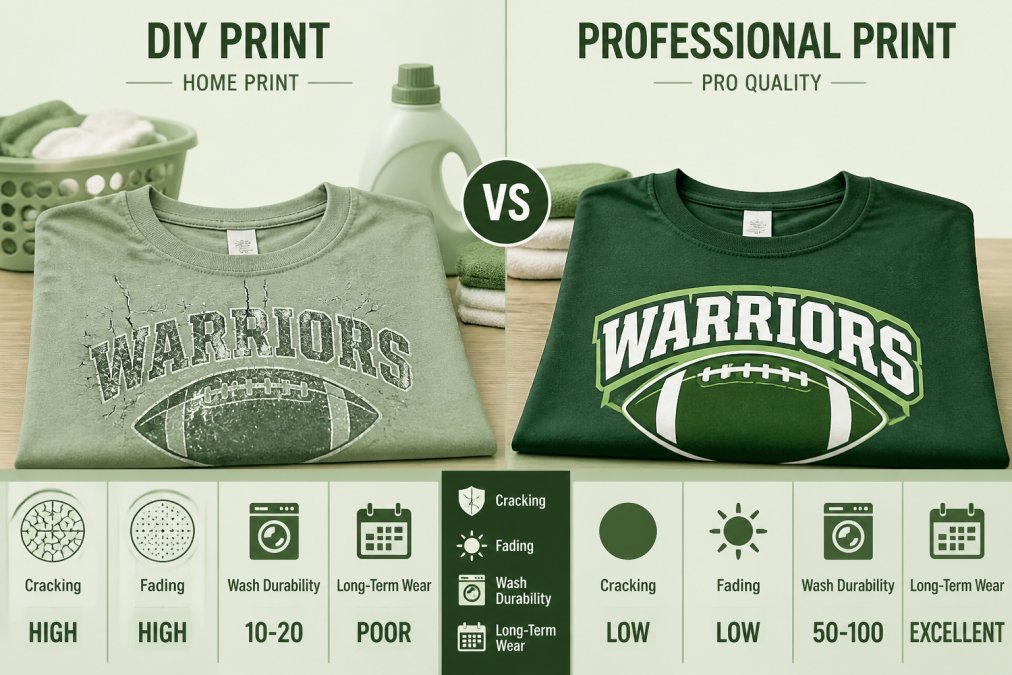
Wash-Test Results: What Survives 50 Cycles
Wash fastness depends on the method, the ink or vinyl, and how you launder the shirt. Professional prints generally hold color and shape longer than home iron-on transfers. Here's how the common methods behave through roughly 50 cycles:
| Print Method | Typical Wash Performance | Main Failure Mode |
|---|---|---|
| Professional DTG | Holds up over many cycles | Slight fading over years |
| Professional screen print | Very durable | Cracking if under-cured |
| Home HTV | Peels at edges over time | Adhesive failure |
| Home iron-on transfer | Fades and cracks sooner | Film lifting |
- Professional screen print: color and edges stay crisp well past 50 washes when the ink was properly cured. Under-cured ink is the exception, it cracks early and can't be rescued.
- Professional DTG: holds detail and color through dozens of cycles, with gradual softening and light fading rather than sudden failure.
- Home HTV: the first sign of trouble is usually edge lift, often between 15 and 30 washes depending on press temperature, pressure, and laundering. Once an edge lifts, the peel spreads.
- Home iron-on transfer: the film layer is the weak point. Cracking and fade show up earlier than with HTV, and the print can feel plasticky from day one.
Why Prints Fail: The Mechanisms Behind the Wear
Understanding why a print fails tells you how to prevent it:
Custom One Team. One Heart. One Goal →
- Adhesive fatigue (HTV and iron-on): heat and detergent break down the glue holding the vinyl to the fabric. Cold water and inside-out washing slow this down.
- Under-curing (screen print): ink that didn't reach full cure never fully bonds to the fiber. It looks fine on day one and cracks within a few washes.
- Abrasion (all methods): tumbling against other garments in a hot dryer wears down the print surface. Air-drying or low heat preserves it.
- Heat damage (all methods): direct iron contact melts ink and vinyl. This is irreversible.
Care Protocol That Extends Print Life
The care label matters as much as the print. Merch by Mary Ellen recommends washing custom tees inside out in cold water and tumble drying on low. A few habits push that further:
- Turn the shirt inside out before it hits the hamper, not after.
- Skip fabric softener and dryer sheets, both leave a residue that weakens adhesives and dulls ink.
- Wash printed shirts with similar fabrics, not heavy denim or towels that abrade the surface.
- Hang or lay flat to dry when you can; the dryer is the harshest step for any print.
- Store folded, not on a hanger that stretches the collar and stresses the print.
When DIY Team Shirt Printing Makes Sense
DIY team shirt printing makes sense for tiny runs, tight deadlines, and one-off designs. If you need five shirts and already own a heat press, printing at home is cheaper and faster than ordering.
- Small batches under 10 shirts
- Designs you're still testing
- Shirts needed within a day or two
- Craft projects where the process is the point
When Professional Team Shirt Printing Wins
Professional team shirt printing wins when consistency, quantity, and finish matter more than saving a few dollars per shirt. Coordinated rosters need every shirt to match, and a shop delivers that reliably.
Environmental Impact: DIY vs Professional Printing
Environmental impact is a factor most DIY guides skip. Home setups generate more waste per finished shirt because beginners ruin blanks, and small ink and vinyl purchases come in more packaging per unit.
Legal and Copyright Considerations for Team Shirts
Copyright and trademark rules apply to team shirts whether you print at home or order from a shop. Using a pro league's logo, a college mascot, or a trademarked slogan without permission is infringement, and the customer carries the liability.
- Team names and logos you created are generally yours to print
- Pro and college trademarks require a license, even for a small run
- Licensed characters and brand logos need permission
- Photos and artwork need the creator's consent
Conclusion
Getting team shirts right comes down to matching the method to your roster, timeline, and tolerance for reprints. DIY saves money on tiny batches; professional printing wins on consistency, durability, and volume.
Frequently Asked Questions
Is it cheaper to print team shirts at home or use a professional?
For small batches, DIY heat transfer vinyl can be an option. Professional printing on a custom tee runs $21.99-$36.99 per item, but includes design help and no equipment investment. For larger orders, professional bulk pricing usually beats DIY once you factor in ink, vinyl, and your time.
How do professional team shirts hold up compared to DIY versions?
Professional DTG prints on quality garments typically survive 50+ wash cycles with minimal fading when cared for properly. DIY heat transfer vinyl often starts peeling after 15-20 washes, especially if you tumble dry on high heat. Screen-printed shirts from a pro shop last longest, but DTG is close behind for most team needs. Always wash inside out in cold water to extend print life.
What is the best printing method for sports teams on a tight deadline?
Heat transfer vinyl is fastest for DIY, but you still need to cut, weed, and press each shirt. For a tight deadline on multiple shirts, professional DTG or screen printing is more reliable. You upload vector files, approve a proof, and the shop handles production. This means you are not stuck pressing shirts at midnight before the tournament.
Do I need special design files for professional team shirt printing?
Yes, vector files (AI, EPS, PDF) give the best results for screen printing and DTG. If you only have a JPG or PNG, professional shops can often work with it, but resolution matters. A 300 DPI image at print size works for DTG. For screen printing, vector files are preferred because they scale without blur. DIY heat press projects can use PNG files with transparent backgrounds for simpler designs.